Using paintball cylinders for kegging.
Paintball CO2 cylinders are readily available, low cost and of a convenient size and weight for use in kegging, especially for portable use. Normally, one 9 ounce cylinder will dispense a 1/2 barrel or 3 5 gallon "corny" kegs. They're small and cheap enough that you can keep a few spares around. If you have a leak you don't lose much gas.
Paintball cylinders come in many different types and sizes. I recommend the 9 (sometimes 10) ounce steel cylinders. These cylinders are about 2 inches in diameter and 10 inches tall (without the valve). A big advantage to this size cylinder is that they do not need pressure testing on a regular basis ("\1\ Any cylinder not exceeding 2 inches outside diameter and less than 2 feet in length is excepted from volumetric expansion test." - 49CFR180.209). You can make a convenient holder for these from a short length of 2 inch PVC pipe - heat and pinch one end so the cylinder can't fall through. Note: 9 ounce aluminum cylinders are larger.
The fitting used for paintball cylinders is a modified form of the standard CGA-320 used for larger CO2 cylinders. The main difference is that paintball cylinders use an o-ring for sealing the connection instead of a washer. A standard CO2 regulator (with a washer) will attach just fine.
The other difference is that most paintball cylinders are equipped with a "pin valve." When mated to a paintball marker (for some reason, they seem to not want to call them "guns"), a small post in the connection presses against a pin on the cylinder valve, opening it automatically. A standard CO2 regulator will not open the pin valve. Here's a picture of a pin valve, note the small pin sticking out of the center - when screwed into a standard paintball connection, this pin is pushed in, opening the valve: 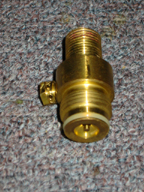
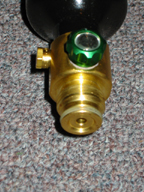
Fortunately, on/off valves are available to replace the standard pin valves. On/off valves give you manual control over the CO2, just as on a large cylinder. You can still use the cylinder for paintball if you want, but the gas would be manually controlled by turning the valve instead of automatically with the pin system. The on/off valves I have used are made by Smart Parts, but others are available (32 Degree is another brand). The Smart Parts valves can be found for about $15. Also available are on-off valves which screw onto the existing pin valve instead of being a replacement. Search eBay or Google for "on off valve paintball". Here's a picture of a Small Parts on/off valve, attached to a 9 ounce cylinder. Note the absence of the pin and the manual valve on the side:
If you get a replacement valve, you should know that the stock valve will probably be held tight with threadlocker, so it may take a bit of work to get it off. You should use threadlocker when installing the replacement.
One advantage of add-on vs. replacement valves is that they can be moved between cylinders, making the overall cost less. The disadvantage is that they extend the length of the cylinder/regulator.
You can take the cylinders to your local paintball place for refill, or get the equipment to do it yourself.
If you wish to refill the cylinders yourself, refill adapters are readily available (search eBay or Google for "paintball cylinder refill"). These contraptions, which usually run $30-40, allow you to refill a paintball cylinder using a larger bulk one. I recommend you get one with 2 ball valves (bulk tank connection/ball valve/hose for paintball tank/ball valve), this makes refilling very easy.
You'll also want/need a scale to measure how much CO2 is going into your cylinder. I find that a cheap electronic fishing scale with 1 ounce accuracy works well (about $20).
If you want to refill from a cylinder normally used for kegging, you will need to invert it in order to fill the paintball cylinder. This is because to refill we need liquid CO2, which is at the bottom of the tank. I use paintball cylinders exclusively for dispensing, so I have a large 50 pound CO2 cylinder which has a "dip tube" installed. The dip tube extends from the valve to near the bottom of the cylinder, so it can deliver liquid CO2 with the tank upright. It's no more than a piece of copper tubing and a plumbing fitting. 50 pounds of CO2 lasts quite a while, and is much cheaper per pound than when filling 5 or 10 pound tanks. It seems most of the cost of CO2 is related to the labor involved in filling, not the CO2 itself.
Refilling instructions should come with the adapter. Here's a refiller:
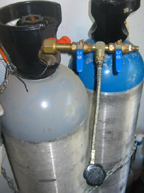
In the instructions below, I'll refer to 4 valves - The "tank valve" is the one on top of the large CO2 tank; the "supply valve" is the ball valve closest to the large tank; the "paintball valve" is the on/off valve on the cylinder you're refilling; the "dump valve" is the ball valve farthest from the large tank (far right in the picture).
To use it,
1. Screw the paintball cylinder into the connector on the end of the hose.
2. Close both ball valves. They're closed when the handle is perpendicular to the fittings. They are shown closed in the picture.
3. Open the tank valve and the paintball valve.
4. Slowly open the dump valve. If there was any CO2 left in the paintball cylinder, it will come out, and the cylinder will get very cold. Hold it by the connector or use a pair of gloves. Let all the CO2 out, then close the dump and paintball valves. Remove the paintball cylinder and weigh it. The weight empty is the "tare weight." Make note of it, you'll need it later.
4a. If no CO2 came out, you need to put a little in first to chill the cylinder. Close the dump valve and open the supply valve for just a couple of seconds. This will put some CO2 into the paintball cylinder. Close the supply valve and go back to step 4.
5. Open the dump valve (nothing should come out). Slowly open the supply valve, just a bit. At first, CO2 gas will come out, it will make a sound but you won't see anything. After a few seconds, as liquid CO2 is pushed up the dip tube, you'll notice it change to a mist as liquid CO2 starts to come out. (It will look like fog, not a stream of water)
6. As soon as the liquid starts coming out, close the dump valve and open the supply valve all the way. The paintball cylinder will fill rapidly, and you'll notice that the frost on the outside will melt. You will be able to hear the CO2 moving as it fills the tank.
7. When you no longer hear the CO2 moving, close the supply valve and the paintball valve.
8. There's still liquid CO2 in the refiller between the supply, paintball and dump valves. Open the dump valve to release it. There should be a very brief burst as it is released.
9. Make sure all the valves are closed, and remove the paintball cylinder. You're almost done.
10. The final step is to weight the cylinder you just filled. Subtract the tare weight from the filled weight to determine how much CO2 went into the cylinder. If it was more than the cylinder capacity, slowly open the paintball valve just a bit and let some CO2 out. Close the valve and weigh it again. Repeat until you're at or under the rated capacity.
11. All done.
It's really pretty easy. Make sure you understand what's going on and why you're doing things. After doing it a few times, you can fill a cylinder in well less than a minute. Remember, you're working with high pressure gas, so be careful.